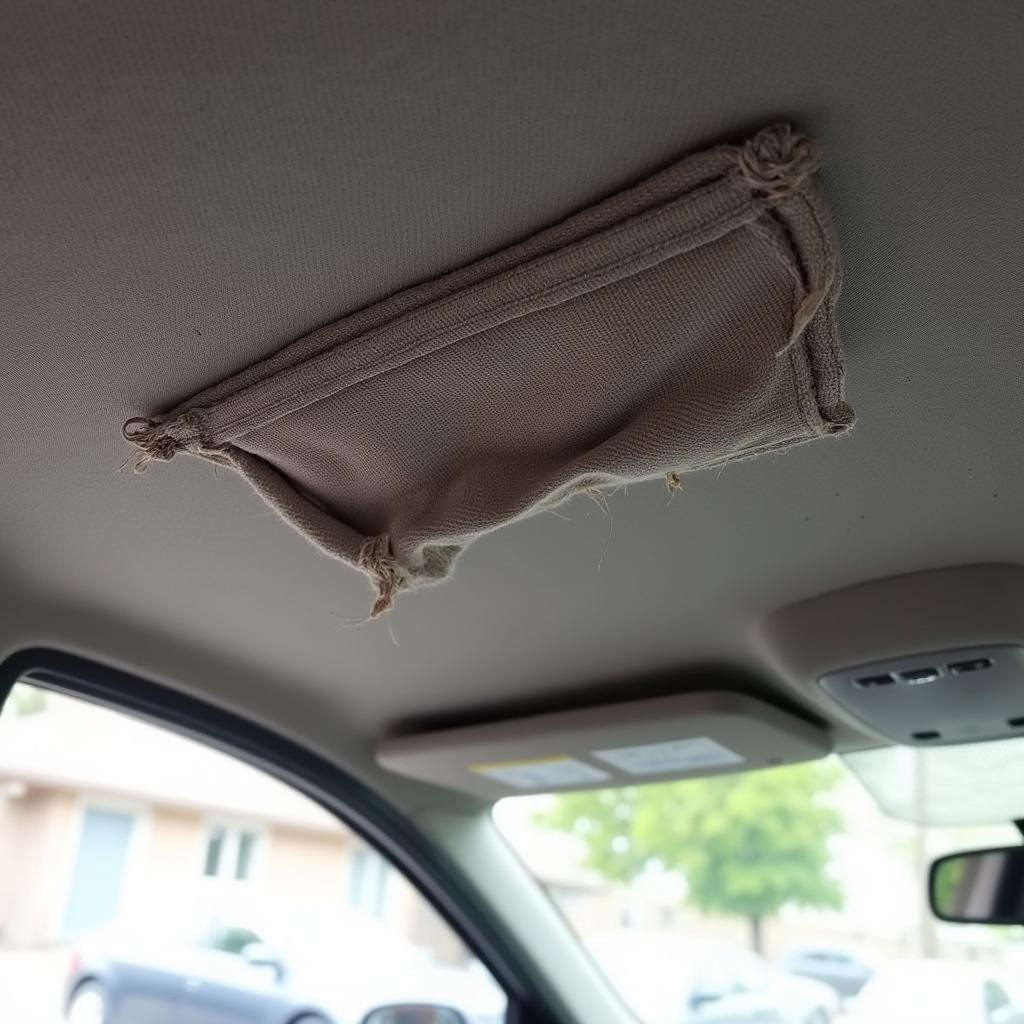
A drooping headliner is a common issue for car owners, often making the interior feel old and worn out. But before you panic and head to the mechanic, you might be able to tackle this problem yourself. This guide will walk you through the causes, solutions, and step-by-step instructions to fix a sagging headliner in your car.
 Sagging Car Headliner Problem
What Causes a Car Headliner to Sag?
Your car’s headliner is made up of a few layers – usually a backing board, adhesive, and fabric. Over time, the adhesive can deteriorate due to several factors:
- Heat: Extreme temperatures inside the car, especially during hot summer months, can cause the adhesive to weaken and lose its bond.
- Humidity: Moisture in the air, especially in humid climates, can seep into the headliner and damage the adhesive over time.
- Age: Like any other component in your car, the headliner adhesive naturally degrades with age, eventually leading to sagging.
- Poor Installation: If the headliner was previously repaired or replaced incorrectly, the adhesive might not have been applied properly, leading to premature sagging.
DIY or Call a Professional?
Deciding whether to fix a sagging headliner yourself or seek professional help depends on your comfort level with DIY projects and the severity of the problem.
DIY might be suitable if:
- The sagging is minor and localized to a small area.
- You’re comfortable working with tools and adhesives.
- You want to save money on repair costs.
Consider a professional if:
- The headliner is severely sagging or detached in multiple areas.
- The headliner fabric is torn or damaged.
- You’re not confident in your DIY skills or lack the necessary tools.
How to Fix a Sagging Car Roof Lining: Step-by-Step Guide
If you’ve decided to tackle this project yourself, follow these steps for fixing headliner in a car:
1. Gather Your Materials:
- High-Temperature Headliner Adhesive: This specialized adhesive is designed to withstand the heat inside a car. Avoid using standard spray adhesives, as they might not hold up over time.
- Clean Cloth or Rags: You’ll need these for cleaning the headliner surface and applying adhesive.
- Scissors or Utility Knife: For trimming excess fabric or foam backing.
- Screwdriver Set: To remove any trim pieces or accessories attached to the headliner.
- Painter’s Tape: To mask off areas around the headliner to prevent adhesive from getting on other surfaces.
- Heavy Objects: Books, paint cans, or anything with weight to apply pressure while the adhesive dries.
2. Prepare the Headliner:
- Clean the Area: Use a clean cloth or rag to wipe down the headliner surface where the adhesive will be applied. This removes any dust, dirt, or debris that could prevent proper adhesion.
- Remove Obstacles: If any trim pieces, visors, or accessories are in the way, carefully remove them using a screwdriver.
3. Apply the Adhesive:
- Follow Instructions: Carefully read and follow the manufacturer’s instructions on the adhesive packaging.
- Even Application: Apply the adhesive evenly to both the headliner backing board and the back of the sagging fabric.
- Allow to Tack: Most headliner adhesives require a short “tack time” before pressing the fabric back into place. Refer to the adhesive instructions for the recommended tack time.
4. Reattach the Headliner Fabric:
- Careful Positioning: Carefully align the fabric with the headliner backing board, ensuring it’s smooth and wrinkle-free.
- Firm Pressure: Once positioned, apply firm and even pressure to the fabric, ensuring it bonds securely with the adhesive. Use your hands or a clean roller to press the fabric onto the backing board.
- Support with Weight: Place heavy objects like books, paint cans, or boxes on top of the repaired area to apply consistent pressure while the adhesive cures. Leave the weights in place for the amount of time recommended in the adhesive instructions (usually 24-48 hours).
5. Reassemble and Inspect:
- Once the adhesive has fully cured, remove the weights and any painter’s tape.
- Reinstall any trim pieces or accessories you removed earlier.
- Inspect the repaired area to ensure the headliner is securely attached and there are no wrinkles or air bubbles.
Tips for a Successful Headliner Repair:
- Ventilation: Work in a well-ventilated area to minimize exposure to adhesive fumes.
- Temperature Matters: Ideal temperature for adhesive application is usually between 65-85°F (18-29°C).
- Test on Hidden Area: If possible, test the adhesive on a hidden area of the headliner to ensure compatibility and adhesion strength before applying it to the visible area.
- Act Quickly: Addressing a sagging headliner sooner rather than later is recommended. The longer you wait, the more the adhesive deteriorates, and the repair might become more complex.
[image-3|car-headliner-repair-process|Step-by-Step Car Headliner Repair Process|A four-panel illustration demonstrating the key steps of a DIY car headliner repair.
Panel 1: Cleaning the headliner surface with a cloth.
Panel 2: Applying adhesive to both the headliner backing and the fabric.
Panel 3: Carefully pressing the fabric back onto the headliner board.
Panel 4: Placing heavy objects on the repaired area to apply pressure while the adhesive dries.]
How to Fix the Ceiling Fabric in My Car: Alternative Solutions
If your car ceiling fabric is extensively damaged or beyond a simple adhesive fix, here are a few alternative solutions:
- Headliner Replacement Kit: These kits are available for specific car models and include a pre-shaped headliner board with new fabric already attached. They offer a more convenient but slightly more expensive solution than repairing the existing headliner.
- Professional Upholstery Repair: If you’re not comfortable with DIY or the damage is extensive, consider taking your car to a professional upholstery shop. They have the experience and expertise to repair or replace your headliner to a high standard.
How to Fix Car Roof Lining and Panel: Additional Considerations
When dealing with a sagging headliner, it’s essential to inspect the roof panel itself for any underlying issues:
- Rust or Water Damage: If you notice rust or water stains on the roof panel, it indicates a leak that needs to be addressed before repairing the headliner. Ignoring a leak can lead to further damage and mold growth.
Conclusion
A sagging headliner can be an annoying problem, but it’s often a manageable DIY project using the right tools and techniques. By following these steps and using the right adhesive, you can have your car’s interior looking its best again. However, if you’re dealing with severe damage or aren’t comfortable with DIY, don’t hesitate to seek professional help.
For further assistance or expert advice on car repairs, feel free to contact AutoTipPro at +1 (641) 206-8880 or visit our office at 500 N St Mary’s St, San Antonio, TX 78205, United States. Our team of experienced mechanics is always ready to assist you with all your automotive needs.
FAQs About Sagging Car Headliners
1. Can I use regular spray adhesive to fix my car headliner?
It’s not recommended to use standard spray adhesives as they are not designed to withstand the high temperatures inside a car and may not hold up over time. Look for specialized headliner adhesive that’s specifically formulated for automotive applications.
2. How long does it take for headliner adhesive to dry completely?
Drying time varies depending on the adhesive brand and environmental factors, but most headliner adhesives require at least 24-48 hours to cure fully. Always refer to the manufacturer’s instructions for specific drying times.
3. Can I prevent my car headliner from sagging in the first place?
While you can’t entirely prevent headliner sagging due to natural wear and tear, parking your car in shaded areas to minimize heat exposure and regularly cleaning the headliner to remove dirt and moisture can help prolong its lifespan.
4. My car headliner is sagging, but the fabric is ripped. Can I still repair it myself?
If the fabric is ripped, a simple adhesive fix might not be sufficient. You might need to consider patching the tear with matching fabric or using a headliner repair kit.
5. How much does it cost to have a car headliner professionally replaced?
The cost of professional headliner replacement varies widely depending on the car model, labor rates, and the type of material used. On average, you can expect to pay between $150 to $400 for a professional headliner replacement.


Leave a Reply